Showing posts with label open. Show all posts

Monday, March 9, 2009

Burning an entirely open source DVD (with Menus!)

This tutorial is for a little more advanced tinkerers so read on bold burner!

Okay, so most people are not satisfied with DVD Flick on its own for one main reason. No menus. Trust me, it's been suggested to the author MANY times and he always responds that DVD Flick was not written with menus in mind. And, let's face it, I didn't write any of the code so I'm not going to gripe. I love DVD Flick (see previous post). But, it is nice to have some menus on your burned DVDs - especially if you are sharing them with others. In an exhaustive effort to find a viable open source alternative to my (edit) copy of Encore I discovered another piece of software solves the menu problem nicely: DVD Styler.

DVD Styler allows you to create custom menus with custom buttons and burn simple DVDs (or complex DVDs if you're truly brave). I've spent WAY too long working on this program to get the output that I wanted so I figured I would pass the resulting wisdom along and save my readers some precious time. So here's the easy way to do it:

1. Burn your video files to an .ISO with DVD Flick (yep, you'll still need it.) Two reasons, 1 - it'll burn anything - especially those pretty xvid files you've created with autogk. 2 - DVD Styler is happiest when you feed it .VOB files - DVD Flick creates these nicely. They can be found in DVD Flick's temp files or by mounting the image and exploring the .ISO or by burning the image and exploring the resulting DVD. However you do it, you'll want to create the .VOB files before fiddling with DVD Styler.

2. Now, open DVD Styler and select a background. If you don't like any of the default backgrounds you can add your own by dragging an image file into DVD Styler's black workspace. Note: I always edit my images and size them to 720x480 in Gimp before importing them into DVD Styler.
3. Add your newly created .VOB file by going into the file browser tab on the left and dragging the .VOB into the resources section at the bottom of DVD Styler. It will automatically be assigned a title number to look something like this:


4. Now go to the buttons tab and select a default button. Drag it over to the workspace and place it where you would like it to show on the menu. By double clicking the newly placed button you can change the text and behavior of the button including which 'title' is played when it is selected. After adjusting the buttons as desired your are ALMOST ready to burn.

5. Go to the dropdown menus at the top and select Configurations > Settings and adjust the settings to represent the kind of DVD that you are going to burn. Then go to the DVD dropdown Menu and select Options. Give your DVD a label (name) and make sure all of these settings are also correct. Finaly...

6. Click the red circle icon to Burn the DVD.

If you've followed these instructions then it should burn without problems. IF it doesn't burn right then you may need to tinker a bit. Let me know if you have a problem and I'll see if I can't help ya out. Otherwise, happy burning!

Thursday, March 13, 2008

Open Source Video Compression Recommendations

Have you ever wondered how people compress an entire movie down to 700 Mb and it still looks great? Is your hard drive overloaded with HUGE raw DV files that you don’t want to erase? Well then, the answer to all your problems lies in effectively and efficiently compressing your videos. If you compress your vids correctly you can get them down to around 500 Mb/hour as opposed to the typical 1.5-2 Gbs on a DVD MPEG2 or the oppressive 1 GB / 5 min of raw DV with very little quality loss.
The two options that I would recommend are


  • AutoGK

  • Mediacoder

For both options you’ll need to install Xvid (or Divx) codecs which can be found here:
http://www.xvid.org/Downloads.15.0.html or http://www.divx.com/divx/windows/, respectively.

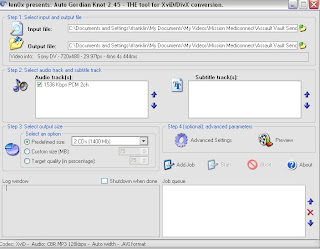
Okay, option 1. AutoGK is the easiest video compression program I’ve found that is open source and free to download. Once you’ve got it set up it can effectively slice and dice batch loads of just about any file type and convert them to compressed xvid or divx .avi. You pick the file size or quality and boom! You’re compressing like a pro. Here’s how you can use AutoGK:

Download and install AutoGK. As of writing this the following link worked:
http://www.autogk.me.uk/
This program is made to be simple so we’re not going to overcomplicate it too much (although you can – try the super secret CTRL F9 once you have the input file in there). Select the video you want to compress as your input file and then as your output file browse (by clicking on the little folder on the right) to where you would like to put the compressed video and then put in your desired file name and click “Save”.


Now you can select which audio track you would like (probably English AC3 or something like that). And, most importantly, you can select the size! I find that the 1 CD predefined setting works well for movies that are 1.5 hours, 899 custom size for movies around or under 2 hours, and 2 CD predefined for epic movies (like LOTR) but you can fiddle with it a bit to find what works best for you. This of course is assuming that you want high quality video for playback on a TV. For lower quality (portable player) you can drop it even lower. Go to the advanced settings and select the width that you would like (I personally always compress to 720 width for full screen TV playback and 320x240 for playback on my palm). Your codec should be accurately selected and then for audio use VBR MP3 around 128 kbps which will give you good sound. If you want AWESOME sound by sacrificing video quality you can go with original sound or a higher bitrate MP3 – up to you. And that’s it. Click “Add Job” right below the advance settings and move on to the next video that you want to compress (if you are doing a batch). Finally, when it’s all perfect click start and walk away for several hours or go to bed or fishing or whatever cuz this is going to take a while. On average my videos take about the same amount of time to compress as it would to watch them so it’ll take a while. When you come back you should find a small yet pretty video file ready and waiting. When you are satisfied with the product go back in and erase all of big .avi or .mpg files and use the smaller video however you would like. The only problem with AutoGK is that it is a bit of a one trick pony and if you want more options or control then you’ll need a different program. My recommendation is Mediacoder.

Option 2. My brother first introduced me to this program and it is really awesome. Once again, it is open source and you can get it here:
http://mediacoder.sourceforge.net/
Mediacoder It lets you control every aspect of the video compression process. You can pick the codec that you compress with including h.264, xvid, and windows media. You can also choose the bitrate of the video, the bitrate of the audio, the number of audio channels, and a whole slew of other options. I’m not going to go into nearly as much detail with this one as I did with AutoGK but if you want to control how you are converting and compressing then you should definitely give this program a go. It will also handle batch files like AutoGK. This is a true video conversion tool as opposed to autoGK with is most just a compression tool.

Finally, if you want to go pro with your compression I’ll recommend Sorenson Squeeze and not just because I used to work for their company. Their program is clean and compresses VERY well – though it is geared for compression for web.

Anyway, there you go. Happy compressing,

zb

A side note for advanced users
AutoGK is built on the popular VirtualDub program created by Avery Lee. It is a subject for a whole different post and definitely an amazing program.
Mediacoder is built on the super cool command line video compression tool FFMPEG. Downloading and using FFMPEG is kinda weird so I would recommend just installing Mediacoder and then you’ve got it. If you want a super easy interface for FFMPEG try GUI4FFMPEG and, if you’re really brave, forget the whole front end thing and build command line prompts to compress to your hearts desire – I find this super useful for pesky files off of DVDs or other files that I didn’t create that I can’t get just right in Mediacoder or AutoGK.