Tuesday, February 17, 2009

Ripping and Compressing DVD

Hello Everyone,

I've had several people ask me recently how to go from DVD to compressed video. Here's the full instructions I wrote some time back:

Sorry it has taken me so long to get this out. If you’d like a quick reference for this process (without the verbose language) it can be found at the end. Here’s what we’ll be talking about today: how to take a DVD (which, of course, you own) and rip it then compress it down to a manageable file size that is viewable on a pc or portable video device except ipods – they’re too snooty to use our lowly (practical) file types. However, there’s plenty of software out there that will convert to h.264 including mediacoder which is mentioned in a previous post. As a matter of fact, there is a mediacoder ipod edition which makes converting vids of any format to ipod a snap. Anyway – here’s what you’ll need:

  1. Divx or Xvid codecs. For all intents and purposes they are the same thing. Divx is commercial and Xvid is open source. These codecs will allow you to encode, decode, and watch wonderfully compressed videos. You can find these codecs here: http://www.divx.com/divx/windows/, and http://www.xvid.org/Downloads.15.0.html respectively. I personally would recommend the xvid codec since it doesn’t ask you to buy it every time you load it.
  2. DVD Shrink. This program will rip the DVD despite its copyright protection and allow you to select which parts of the DVD you want (main movie, subtitles, menus, special features, etc.) Now, this program can be a bit elusive to find since the home page doesn’t host the file. As of the writing of this the following link works for version 3.2.0.15 (the latest version): http://www.afterdawn.com/software/video_software/dvd_rippers/dvd_shrink.cfm.
  3. AutoGK. Stands for Auto Gordian Knot…whatever that means. Anyway, this program will do batch conversion of DVD files (or any video files for that matter) to Divx/Xvid You can find it here: www.autogk.me.uk/
  4. Lame MP3 Encoder. You also might need this nifty little tool. This will let you encode your audio into MP3 and therefore a lot smaller. Remember – audio can be bigger than your video if it is not compressed correctly. I can’t remember if this installs automatically with one of the other programs but just to be on the safe side you can find this open source beauty here: http://sourceforge.net/project/showfiles.php?group_id=290

Okay! You’ve got all the tools now you are ready to start ripping and compressing like a pro. Here we go. First, open up/install the codec files (Divx or Xvid). Next install the other programs in the order I have listed above – not that it really matters but this is also the order we’ll be using them in so…yeah. Okay, once those are happily installed you should select a DVD, drop it in the ‘ole DVD tray, and insert it. Windows will autoplay something whether that’s media player or some kind of installation garbage (New line DVDs = really bad installation garbage). Whatever it does – kill it! We are in control now – no longer shall our operating system tell us what to do…I digress. Okay, breathe a sec. Now it is our turn. Open DVD Shrink and you should have a screen like this:

Click on the “Open Disc” icon and it should bring up the option for the DVD you have inserted. Click “Okay” (note: DVD Shrink only works with regular DVDs NOT with data discs – there must be a Video_TS folder – if you don’t know what that means, don’t worry just skip this note and only use DVDs that work in your DVD Player). DVD Shrink analyzes the DVD (and removes the copyright) and then defaults to Full Disc Backup mode with the DVD Structure on the left and the compression settings on the right. Click on the Re-author button and you get a cool DVD Browser Tab on the right. Your screen should looks something like this:

So – you can fiddle with the extra stuff that you want. I’m going to assume though that you want to just grab the “Main Movie”. Grab that “Title 1” (left click and move it while holding the left mouse button) over to the DVD Structure window then click “Backup!” on the top toolbar. We’re going to save the file to our hard drive so select Hard Disk Folder and then enter a target folder for DVD output files.

Make sure “Create VIDEO_TS and AUDIO_TS subfolders” is NOT checked. Finally, click “OK”. Watch the nifty preview while it rips the video file to your computer (or don’t) and congratulate yourself. You just ripped the files needed to have a high quality, low space video on your computer. When it’s finished move on to the next step.

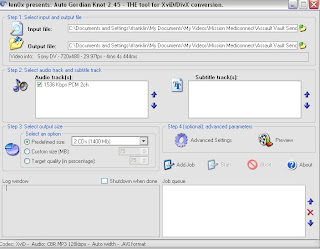
Alright, you are now done with the DVD – put it back in it’s case, use it for a coaster, whatever – you won’t need it again. What we need to do now is compress the ripped files into a leaner, meaner viewable video. Okay now you should open up AutoGK. This program is made to be simple so we’re not going to overcomplicate it too much (although you can – try the super secret CTRL F9 once you have the input file in there). Okay – here’s the secret with AutoGK, you are looking for a .IFO file. If you are going to compress a full movie of 1.5+ hours then the files DVD Shrink spits out will probably be something like

VIDEO_TS.IFO

VIDEO_TS.SUB

VIDEO_1.IFO

VIDEO_1.VOB

VIDEO_1.1.VOB

VIDEO_1.2.VOB

Because of the size of the ripped video it has been broken into several different smaller files which are the .VOB files. The .IFO is a small file that tells the computer how they all of these .VOBs fit together. So select the VIDEO_1.IFO as your input file and then as your output file browse (by clicking on the little folder on the right) to where you would like to put the video and then put in your desired file name and click “Save”.

Now you can select which audio track you would like (probably English AC3 or something like that). And, most importantly, you can select the size! I find that the 1 CD predefined setting works well for movies that are 1.5 hours, 899 custom size for movies around or under 2 hours, and 2 CD predefined for epic movies (like LOTR) but you can fiddle with it a bit to find what works best for you. This of course is assuming that you want high quality video for playback on a TV. For lower quality (portable player) you can drop it even lower. But we’ll keep talking about the high quality low space option. Go to the advanced settings and select the width that you would like (I personally always compress to 720 width for full screen TV playback and then 320 or 240 for playback on my palm). Your codec should be accurately selected and then for audio use VBR MP3 around 128 kbps which will give you good sound (this is where LAME might be needed). If you want AWESOME sound by sacrificing video quality you can go with original sound or a higher bitrate MP3 – up to you. And that’s it. Click “Add Job” right below the advance settings and move on to the next video that you want to compress (if you are doing a batch). Finally, when it’s all perfect click start and walk away for several hours or go to bed or fishing or whatever cuz this is going to take a while. On average my videos take about 2 – 4 hours each to compress so it’ll take a while. When you come back you should find some small yet pretty video files ready and waiting. When you are satisfied with the product go back in and erase all of big .IFO and .VOB files and use the smaller video however you would like. Hope this helps!

Richie

Quick Reference:

  1. Make sure all of the correct software and codecs are installed
  2. Insert a DVD
  3. Open DVD Shrink
  4. Select Open Disc > Select the DVD
  5. Select Re-author
  6. Drag the videos you want to rip to the left “DVD Structure” window
  7. Click Backup
  8. Select a PC location to save the files
  9. Uncheck the make VIDEO_TS AUDIO_TS checkbox
  10. Click OK
  11. Open AutoGK
  12. Select the .IFO (or .VOB if it’s a smaller file) for the Input File
  13. Select an output file location and name
  14. Make sure the correct audio track is selected
  15. Select the desired file size of the video
  16. Select “Advanced Settings” and choose the width you want
  17. Select “Add Job” (you can add additional jobs if you would prefer to batch convert)
  18. Click “Start”
  19. When AutoGK has finished find the file and double click (or move it to your portable device)

20 steps – not really a piece of cake but it can do the trick like a wizard and it’s relatively quick and hands free once you’ve done it a time or two!

Finally I would also recommend:

DVD Decrypter. This is actually optional in the process. I really love this program and it’ll rip some DVDs that DVD Shrink won’t (although we needed slysoft’s anydvd program which is not free to rip Ratatouille). It’s fantastic if you want to copy DVDs or burn .ISO files (it actually uses an even easier burning program called imgburn to burn but it’s a nice, easy little interface).

Tuesday, December 23, 2008

DVD Flick – DVD burning software that just works

I stumbled across DVD Flick one day when I was in need of converting an .flv (flash video a la youtube) to a format that I could burn to DVD. None of my commercial software handled the .flv very well, especially getting it to a .vob that could be effectively burned to DVD. After downloading DVD Flick (which is relatively small <8>

Here’s the program’s home:

http://www.dvdflick.net/

And here’s a great guide on how to use it:

http://beginwithsoftware.com/videoguides/dvd-flick-guide.html

I might mention that DVD Flick is technically a front end for some other excellent software that make up the nuts and bolts of open source DVD burning. Namely, DVD Author, ImgBurn, delaycut, and ffmpeg for compression.

zb

Tuesday, March 18, 2008

Color correcting DV

One of the things that a lot of amateur DV film makers overlook is the amazing power of digital color correction. If you’ve ever watched dailies or outtakes/bloopers from a feature film you can see how very important color correction is. It can make your video look like a film instead of a home video. Options for color correction are all over the place. It’s possible to do some pretty good color correction in Virtual Dub with plugins or avisynth plugins but honestly I’ve never used them. I have used the brightness/contrast plugins as well as the levels plugin (which is great) but as far as hue/saturation I dunno. I’ve been using Premiere for years as well as Premiere elements which is a GREAT program for the price. Both will let you do some pretty hefty color corrections. Unfortunately, there are no open source video editors that I am aware of. Unless you have a mac, you’re stuck with Windows Movie Maker (blech) for video editing. Fortunately, Virtual Dub has blown video processing out the box – but it’s not really an editor. That’s a subject for a different post though. Here’s what you’ll be dealing with when you CC your video.

In your video editor (or if you want to practice in your photo editor you can – try The Gimp) go to the colors options. Look around through your dropdown menus at the top and you should find a group of options that say something like Levels, Brightness/Contrast, Hue/Saturation etc. THOSE are the things you’ll need to fix up the color. The first thing you want to do is make sure that your black is black and/or white is white.

If you’re using a powerful enough program then it can do this for you. Open up the levels filter and look for a little eye dropper or some option to set the black point or white point. If you have one of these beauts then you’re in luck. You should be able to click on that eyedropper or button or whatever, move it over to your picture and click on a point of the picture that you want to designate as black or white (depending on the selection available). This will automatically set the levels for the rest of the image according to what is needed to change that point to black or white (similar to a manual white balance on a camera). If you don’t have this option then you’ll need to adjust brightness and contrast and perhaps certain color saturations to try and really make the black areas look black and the white areas look white. The problem with “eyeballing” this is that most monitors are a bit off in their color calibration and therefore you could be correcting to the wrong colors.

Once your whites are looking white and blacks black then you can adjust brightness contrast (film tends to be a bit darker – but not always) and you’ll want to adjust the hue/saturation. The thing to remember with hue/saturation is that the hue is the color of the colors you are working with. The saturation is the “trueness” of the color. Think about dropping red food coloring into a glass of water. The higher the saturation of the color the more drops you add to the glass.

Now comes the fun part. As you play with the different color options you can completely change the look and feel of your video. For example:

Before:


And After:

The great thing about Color Correcting your video is that you can give it whatever feel you want. Play around with a few of the other color options and you’ll be amazed with what you can come up with.

If you want to read my first education on color correction (since these guys gave me some great tips) you can check out this really great forum thread here:
http://www.dvxuser.com/V6/showthread.php?t=90759
Hooray for post processing!

Richie

Surround Sound AC3 on an HTPC

Over the weekend I mounted the speakers from our surround sound system and have since become very interested in getting not just good sound, but GREAT sound out of my HTPC. Here’s some of the info I came up with.

Basic AC3 overview:
AC3 is the audio file type used on most DVDs to carry the surround sound. If you use AutoGK when you’re compressing .vob files you should see a couple audio options that have 2 or 5 channels (or more depending on the DVD). These are AC3 files. They are audio files coupled together with an MPEG2 video file to make .vob files on your DVD. (note: you can have multiple AC3 tracks within a .vob file). Anyway, on my system I wanted AC3 5.1 channels (which means 3 speakers front, 2 speakers back, and 1 woofer). These AC3 files tend to be significantly larger than an MP3 stereo mixdown (compression) but would be worth the space for the quality IMO. If you are looking for good sound but don’t need the bells and whistles then definitely go with MP3 for the space. Also, in case you’re curious, Dolby Digital is a type of AC3 that requires Dolby codecs to read (pretty standard on newer surround sound systems). DTS is a different kind of audio file which is similar to AC3, though not as common.

Here’s what you’ll need to get surround sound on your HTPC

Hardware:
1. YOUR HTPC SOUND CARD MUST HAVE SURROUND SOUND CAPABILITIES! If you are not sure if yours does you should check the documentation on it. If you don’t know which sound card you have then
go to Start > Run
enter: DXDIAG
click run to open the DirectX Diagnostic Tool
click the Sound tab and you should see your sound card there.
Alternatively, if you do not have a sound card that will push surround sound then you can pick one up or a external USB solution for ~$30. The USB option will just plug into your computer and provide you with a surround sound out (Dolby Digital or DTS).

2. A surround sound system (obviously) (4+ speakers and a console that can process and push surround sound audio) – I have a Sony dream system.

Software:
Your media player needs to have AC3 capabilities. – I recommend installing AC3 Filter (downloadable from www.ac3filter.net) which should work fine with most HTPC media players though most, like Windows media center, should come AC3 enabled.

That should be it. If your PC is connected to your surround system correctly you should hear surround sound coming from all 4+ speakers in your system. To test this try playing a newer DVD with Dolby Digital surround sound. If you want to keep compressed files from your DVD on your HTPC with AC3 surround sound audio then when you are compressing them you need to select an AC3 track without compression (this is easily done in AutoGK by selecting the track you want in the Audio Tracks box then selecting “original” for the output audio type in the advanced settings). The file will be bigger but the sound will be better (and coming at you from all sides)

Luck!

Richie

Thursday, March 13, 2008

Open Source Video Compression Recommendations

Have you ever wondered how people compress an entire movie down to 700 Mb and it still looks great? Is your hard drive overloaded with HUGE raw DV files that you don’t want to erase? Well then, the answer to all your problems lies in effectively and efficiently compressing your videos. If you compress your vids correctly you can get them down to around 500 Mb/hour as opposed to the typical 1.5-2 Gbs on a DVD MPEG2 or the oppressive 1 GB / 5 min of raw DV with very little quality loss.
The two options that I would recommend are


  • AutoGK

  • Mediacoder

For both options you’ll need to install Xvid (or Divx) codecs which can be found here:
http://www.xvid.org/Downloads.15.0.html or http://www.divx.com/divx/windows/, respectively.

Okay, option 1. AutoGK is the easiest video compression program I’ve found that is open source and free to download. Once you’ve got it set up it can effectively slice and dice batch loads of just about any file type and convert them to compressed xvid or divx .avi. You pick the file size or quality and boom! You’re compressing like a pro. Here’s how you can use AutoGK:

Download and install AutoGK. As of writing this the following link worked:
http://www.autogk.me.uk/
This program is made to be simple so we’re not going to overcomplicate it too much (although you can – try the super secret CTRL F9 once you have the input file in there). Select the video you want to compress as your input file and then as your output file browse (by clicking on the little folder on the right) to where you would like to put the compressed video and then put in your desired file name and click “Save”.


Now you can select which audio track you would like (probably English AC3 or something like that). And, most importantly, you can select the size! I find that the 1 CD predefined setting works well for movies that are 1.5 hours, 899 custom size for movies around or under 2 hours, and 2 CD predefined for epic movies (like LOTR) but you can fiddle with it a bit to find what works best for you. This of course is assuming that you want high quality video for playback on a TV. For lower quality (portable player) you can drop it even lower. Go to the advanced settings and select the width that you would like (I personally always compress to 720 width for full screen TV playback and 320x240 for playback on my palm). Your codec should be accurately selected and then for audio use VBR MP3 around 128 kbps which will give you good sound. If you want AWESOME sound by sacrificing video quality you can go with original sound or a higher bitrate MP3 – up to you. And that’s it. Click “Add Job” right below the advance settings and move on to the next video that you want to compress (if you are doing a batch). Finally, when it’s all perfect click start and walk away for several hours or go to bed or fishing or whatever cuz this is going to take a while. On average my videos take about the same amount of time to compress as it would to watch them so it’ll take a while. When you come back you should find a small yet pretty video file ready and waiting. When you are satisfied with the product go back in and erase all of big .avi or .mpg files and use the smaller video however you would like. The only problem with AutoGK is that it is a bit of a one trick pony and if you want more options or control then you’ll need a different program. My recommendation is Mediacoder.

Option 2. My brother first introduced me to this program and it is really awesome. Once again, it is open source and you can get it here:
http://mediacoder.sourceforge.net/
Mediacoder It lets you control every aspect of the video compression process. You can pick the codec that you compress with including h.264, xvid, and windows media. You can also choose the bitrate of the video, the bitrate of the audio, the number of audio channels, and a whole slew of other options. I’m not going to go into nearly as much detail with this one as I did with AutoGK but if you want to control how you are converting and compressing then you should definitely give this program a go. It will also handle batch files like AutoGK. This is a true video conversion tool as opposed to autoGK with is most just a compression tool.

Finally, if you want to go pro with your compression I’ll recommend Sorenson Squeeze and not just because I used to work for their company. Their program is clean and compresses VERY well – though it is geared for compression for web.

Anyway, there you go. Happy compressing,

zb

A side note for advanced users
AutoGK is built on the popular VirtualDub program created by Avery Lee. It is a subject for a whole different post and definitely an amazing program.
Mediacoder is built on the super cool command line video compression tool FFMPEG. Downloading and using FFMPEG is kinda weird so I would recommend just installing Mediacoder and then you’ve got it. If you want a super easy interface for FFMPEG try GUI4FFMPEG and, if you’re really brave, forget the whole front end thing and build command line prompts to compress to your hearts desire – I find this super useful for pesky files off of DVDs or other files that I didn’t create that I can’t get just right in Mediacoder or AutoGK.

Welcome to Digital Video Tidbits

This is my first experience blogging so I thought I would pick something that I spend probably way too much time learning about - digital video. Hopefully this blog will help anyone interested in working with digital video, professional and ameteur alike. Being a relatively poor individual I have done a bunch of digging into affordable (if not free) solutions to a lot of the problems that plague DV users so if you're looking for advice or tutorials on high end programs like avid or even final cut, this is probably not the right place, sorry. Here we'll talk about just about every aspect of DV usage - from shooting to burning to ripping to editing, it's a blog right? We'll go all over. Anyway, I hope you find this info as useful as I did. Happy shooting,

zb

Here are some of the items that I hope to cover. Let me know if there is one you are looking for right away otherwise I'll just work on whichever one suits my mood,

  • Editing options
  • Lighting DV
  • Using the EVF instead of the LCD (unless your EVF is an LCD)
  • Color Correction
  • Compressing options
  • Compressing sound - lame mp3 - surround sound
  • Ripping DVDs - dvddecrypter, dvdshrink, slysoft's anydvd
  • Moving your home DVD library to your HTPC
  • sound Sound SOUND!
  • Burning DVDs
  • Uploading to Youtube or the internet (keeping the quality) sample code for flv player on your site
  • Setting up good dv shots
  • Interlacing
  • Just shoot it!
  • Capturing your DV effectively
  • iTunes, WMP, and other DRMed video
  • The fun stuff - keying and mattes, models and miniatures, and other "how did they do thats?"!